이전 글에서 apify로 리뷰를 크롤링하고 분석 내용을 구글 스프레드시트에 자동 업데이트하는 n8n 워크플로우를 설명했다.
https://ironyoo.tistory.com/42
[AI마케팅자동화] 리뷰 크롤링 후 AI 분석 구글 스프레드시트 업데이트(n8n)
이번 글에서는 [리뷰 내용 크롤링► AI 리뷰 분석► 구글 스프레드시트 업데이트] N8N 워크플로우에 대해 이야기하려 한다.📌이 글에 나오는 툴 정보📌1️⃣ n8n -url: https://n8n.io/ -여러 api를 한 번
ironyoo.tistory.com
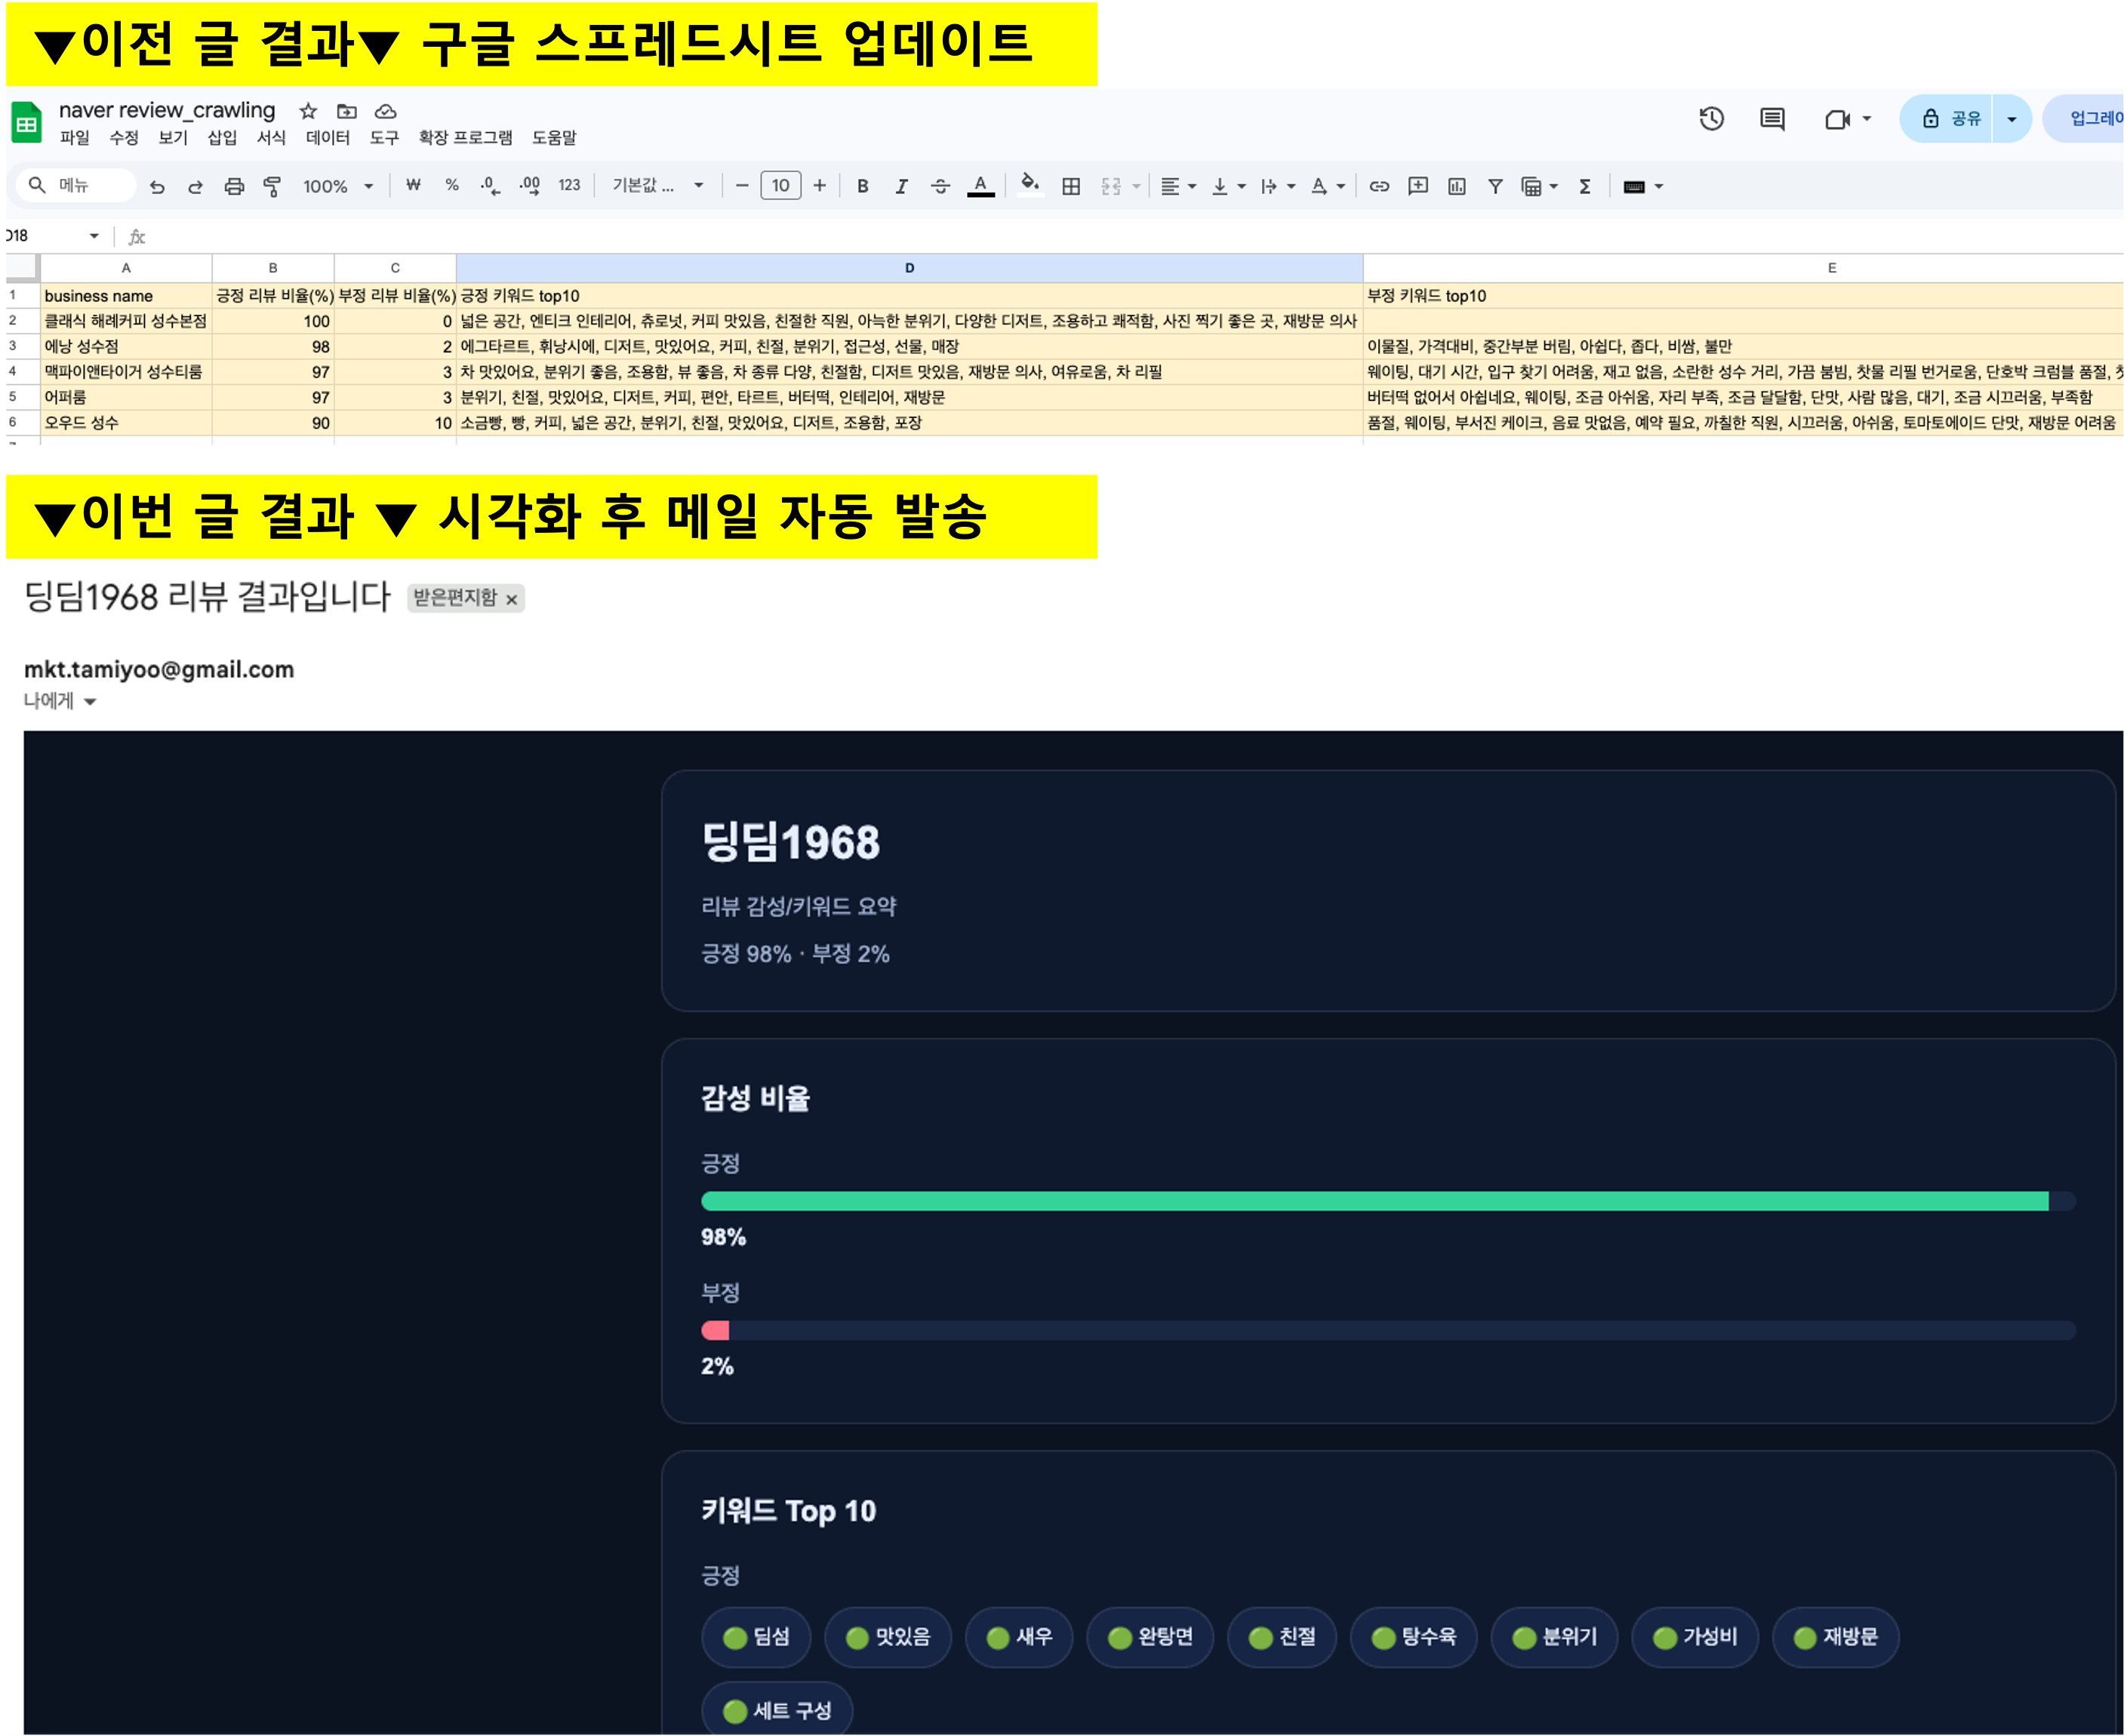
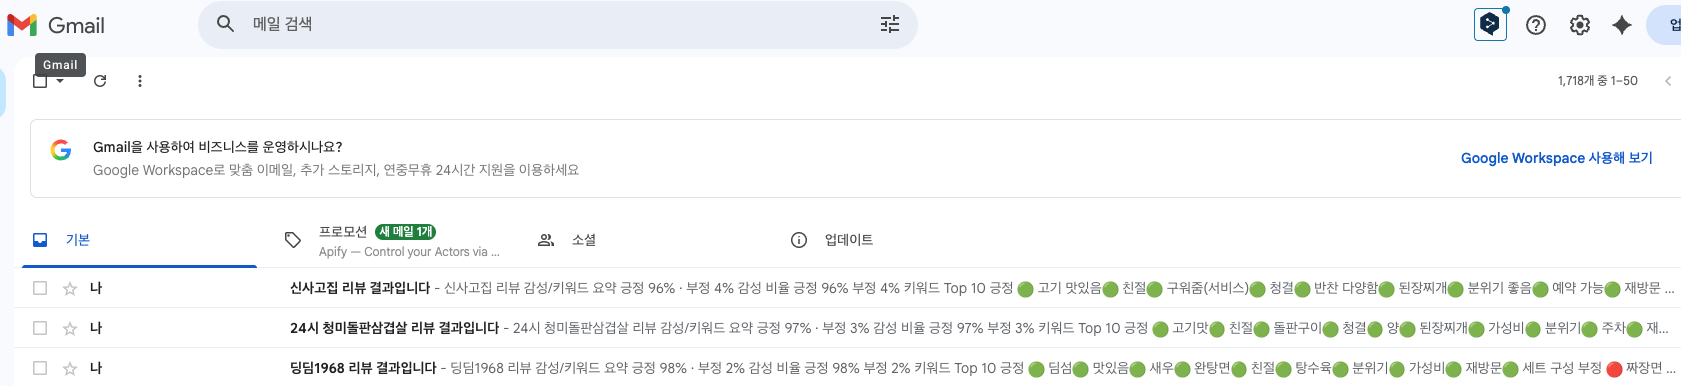
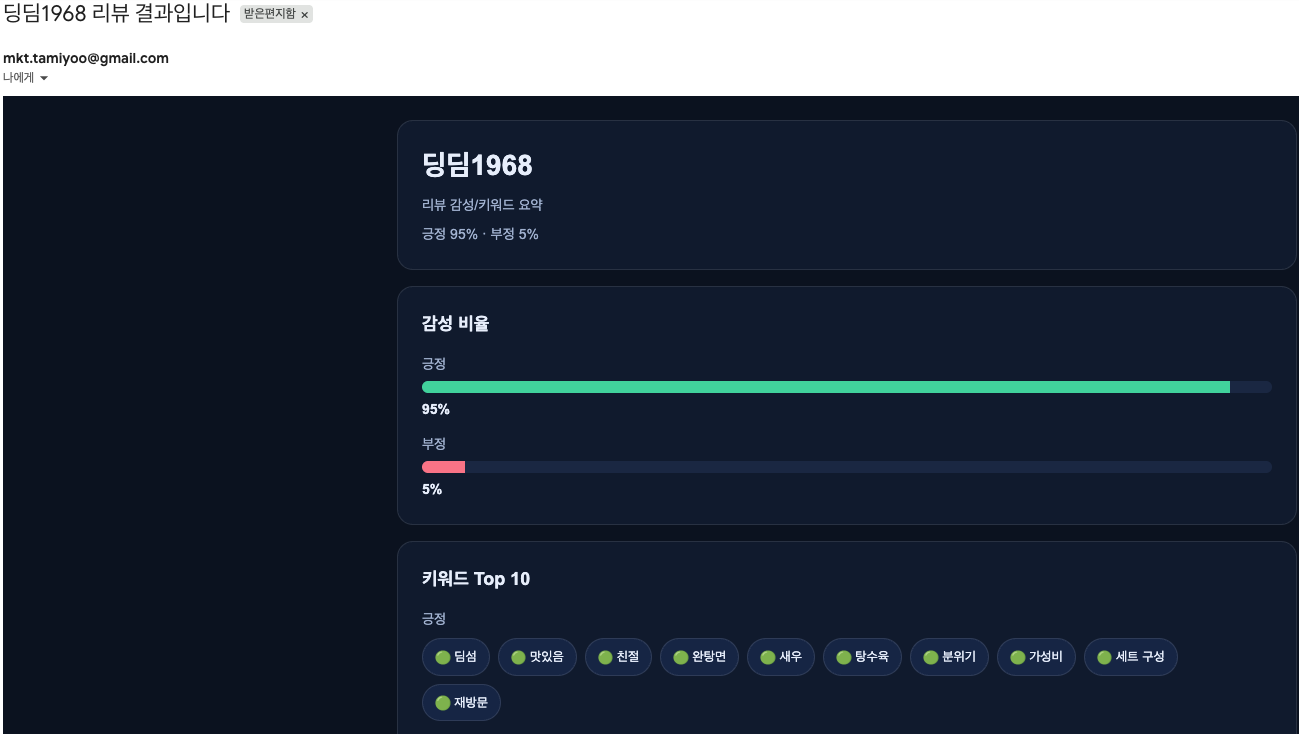
이번 글에서는 크롤링 분석 결과를 html 형식으로 꾸며 메일로 자동 발송하는 부분을 이야기하려 한다. 이전 글은 아래와 같이 구글 스프레드시트에 내용을 업데이트하는 것이었다면 이번 글에서는 리뷰 크롤링 결과는 아래와 같이 시각화하여(html로 변경) 메일로 자동 발송하는 방법을 이야기한다.
📌이 글에 나오는 툴 정보📌
1️⃣ n8n
-url: https://n8n.io/
-여러 api를 한 번에 연동해 나만의 AI 에이전트 생성 가능 "구독 필요"
2️⃣ apify
-url: https://apify.com/
-유튜브 댓글 크롤링, 네이버 쇼핑 상품 크롤링 등 다양한 크롤러를 찾을 수 있다 "구독 필요"
✨오늘의 작업 요약✨

👇아래 워크플로우를 함께 공유한다. n8n에 복붙하면 워크플로우를 세부 세팅은 확인할 수 있으므로 참고하면 된다.
이전 글과 달라진 과정을 빨간색 박스 부분이다. (그 전 과정은 이전 글에 자세히 나와있다.)
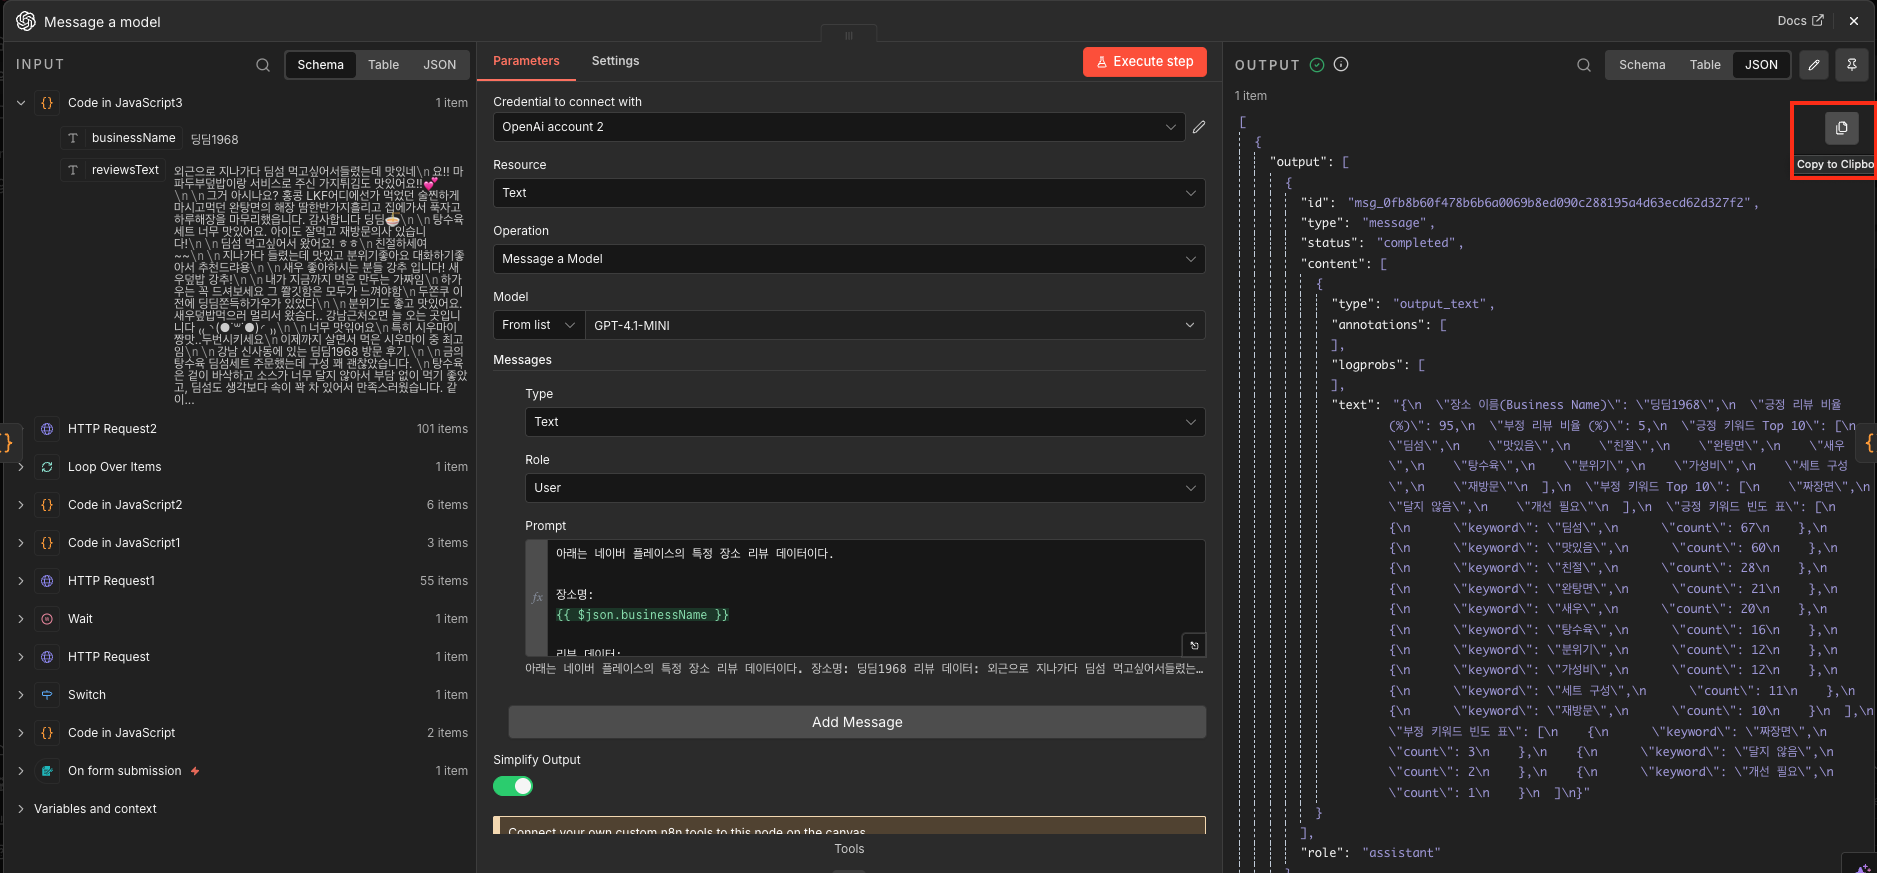
우선 AI ► Message a model 노드의 프롬프트를 아래와 같이 수정했다. 내가 원하는 것을 챗gpt한테 말하면 프롬프트에 넣을 내용을 알려준다. 전과 달라진 것은 긍정 키워드/부정 키워드 표를 생성하는 것인데 각 키워드가 나온 횟수를 표로 정리하는 것이다. 워드클라우드를 생성하기 위한 목적이다.
아래는 네이버 플레이스의 특정 장소 리뷰 데이터이다.

장소명:
{{ $json.businessName }}

리뷰 데이터:
{{ $json.reviewsText }}

위 리뷰를 분석해서 아래 정보를 JSON 형식으로만 반환하라.

조건:
반드시 JSON만 반환할 것
코드블록(```)은 절대 사용하지 말 것
설명 문장 없이 결과만 반환할 것
비율은 숫자만 반환할 것
키워드는 배열 형태로 반환할 것
리뷰 내용 기준으로 긍정/부정을 판단할 것
애매한 리뷰는 전체 맥락을 보고 가장 가까운 쪽으로 분류할 것
리뷰에서 반복적으로 언급되는 핵심 표현, 명사, 형용사, 서비스 요소를 기준으로 키워드를 추출할 것
키워드는 실제 리뷰에 자주 등장한 표현 위주로 선정할 것
유사 키워드는 하나로 통합할 것
예: "친절", "사장님 친절", "직원 친절함" → "친절"
예: "가성비 좋음", "가성비", "가격이 합리적" → "가성비"

장소명 자체, 단순 감탄사, 의미 없는 표현은 키워드에서 제외할 것
예: "여기", "진짜", "너무", "추천", "굿", "최고" 단독 사용 제외

메뉴명, 맛, 가격, 청결, 분위기, 양, 재방문, 대기, 서비스, 접근성 등 리뷰 판단에 의미 있는 표현을 우선 추출할 것
키워드는 출현 빈도가 높은 순서대로 정렬할 것
긍정 키워드와 부정 키워드는 서로 성격이 겹치지 않게 분리할 것
리뷰 수가 적어도 가능한 범위 내에서 최대 10개까지 추출할 것
적절한 키워드가 부족하면 있는 만큼만 배열에 담을 것
워드클라우드 생성을 위해 키워드와 등장 횟수(count)를 함께 계산할 것
긍정 리뷰에서 등장한 키워드는 긍정 키워드 빈도 표로 정리할 것
부정 리뷰에서 등장한 키워드는 부정 키워드 빈도 표로 정리할 것
키워드 빈도는 전체 리뷰 내 등장 횟수 기준으로 계산할 것
키워드 빈도는 keyword 와 count 형태의 객체 배열로 반환할 것
JSON 키 이름은 반드시 아래 반환 형식과 동일하게 맞출 것

반환 형식:

{
"장소 이름(Business Name)": "{{ $json.businessName }}",
"긍정 리뷰 비율 (%)": 0,
"부정 리뷰 비율 (%)": 0,
"긍정 키워드 Top 10": [],
"부정 키워드 Top 10": [],
"긍정 키워드 빈도 표": [
{
"keyword": "",
"count": 0
}
],
"부정 키워드 빈도 표": [
{
"keyword": "",
"count": 0
}
]
}
👇워드클라우드 예시 (출처: https://wordcloud.kr/539013)

그 다음에 나오는 code 노드에서는 [AI 분석 결과를 보기좋게 정리(파싱)하고 HTML 형태에 맞춰 보여지도록] 한다. 나는 HTML을 1도 모르지만 cursur AI를 이용해 바이브 코딩으로 HTML을 생성했다. 뒤에서 좀 더 자세히 설명하겠다.
[code in javascript_AI 분석 결과 정리(파싱 작업)]
const parsed = JSON.parse($json.output[0].content[0].text);

return [
  {
    json: parsed
  }
];
[code in javascript_HTML에 맞춰 보여지도록 작업]
const data = $json;

const posKeywords = data["긍정 키워드 Top 10"] || [];
const negKeywords = data["부정 키워드 Top 10"] || [];
const posFreq = data["긍정 키워드 빈도 표"] || [];
const negFreq = data["부정 키워드 빈도 표"] || [];

const posKeywordHtml = posKeywords
  .map(keyword => `<span style="display:inline-block; margin:0 8px 8px 0; padding:8px 12px; background:#162445; border:1px solid rgba(255,255,255,0.1); border-radius:999px; font-size:13px; color:#e7eefc;">🟢 ${keyword}</span>`)
  .join("");

const negKeywordHtml = negKeywords
  .map(keyword => `<span style="display:inline-block; margin:0 8px 8px 0; padding:8px 12px; background:#162445; border:1px solid rgba(255,255,255,0.1); border-radius:999px; font-size:13px; color:#e7eefc;">🔴 ${keyword}</span>`)
  .join("");

const posRows = posFreq.map(item => `
  <tr>
    <td style="padding:12px; border-bottom:1px solid rgba(255,255,255,0.06); color:#e7eefc;">${item.keyword}</td>
    <td style="padding:12px; border-bottom:1px solid rgba(255,255,255,0.06); text-align:right; color:#e7eefc;">${item.count}</td>
  </tr>
`).join("");

const negRows = negFreq.map(item => `
  <tr>
    <td style="padding:12px; border-bottom:1px solid rgba(255,255,255,0.06); color:#e7eefc;">${item.keyword}</td>
    <td style="padding:12px; border-bottom:1px solid rgba(255,255,255,0.06); text-align:right; color:#e7eefc;">${item.count}</td>
  </tr>
`).join("");

function getPosFontSize(count) {
  return Math.max(14, Math.min(34, 12 + count * 0.35));
}

function getNegFontSize(count) {
  return Math.max(14, Math.min(30, 12 + count * 1.8));
}

const posCloud = posFreq
  .map(item => `
    <span style="
      display:inline-block;
      margin:0 12px 12px 0;
      font-size:${getPosFontSize(item.count)}px;
      line-height:1.2;
      font-weight:700;
      color:#34d399;
      white-space:nowrap;
    ">${item.keyword}</span>
  `)
  .join("");

const negCloud = negFreq
  .map(item => `
    <span style="
      display:inline-block;
      margin:0 12px 12px 0;
      font-size:${getNegFontSize(item.count)}px;
      line-height:1.2;
      font-weight:700;
      color:#fb7185;
      white-space:nowrap;
    ">${item.keyword}</span>
  `)
  .join("");

const html = `
<!doctype html>
<html lang="ko">
<head>
  <meta charset="utf-8" />
  <meta name="viewport" content="width=device-width,initial-scale=1" />
  <title>리뷰 요약</title>
</head>
<body style="margin:0; padding:0; background:#0b1220; font-family:Arial,'Apple SD Gothic Neo','Noto Sans KR',sans-serif; color:#e7eefc;">
  <div style="max-width:900px; margin:0 auto; padding:24px 16px;">

    <div style="padding:24px; background:#101a2e; border:1px solid rgba(255,255,255,0.1); border-radius:16px; margin-bottom:16px;">
      <div style="font-size:28px; font-weight:700; margin-bottom:8px;">
        ${data["장소 이름(Business Name)"] || ""}
      </div>
      <div style="font-size:14px; color:#9fb0d0;">리뷰 감성/키워드 요약</div>
      <div style="font-size:14px; color:#9fb0d0; margin-top:8px;">
        긍정 ${data["긍정 리뷰 비율 (%)"] || 0}% · 부정 ${data["부정 리뷰 비율 (%)"] || 0}%
      </div>
    </div>

    <div style="padding:24px; background:#101a2e; border:1px solid rgba(255,255,255,0.1); border-radius:16px; margin-bottom:16px;">
      <div style="font-size:18px; font-weight:700; margin-bottom:16px;">감성 비율</div>

      <div style="margin-bottom:14px;">
        <div style="margin-bottom:6px; font-size:14px; color:#9fb0d0;">긍정</div>
        <div style="background:#1a2743; border-radius:999px; height:12px; overflow:hidden;">
          <div style="height:12px; width:${data["긍정 리뷰 비율 (%)"] || 0}%; background:#34d399;"></div>
        </div>
        <div style="margin-top:6px; font-size:14px; font-weight:700;">${data["긍정 리뷰 비율 (%)"] || 0}%</div>
      </div>

      <div>
        <div style="margin-bottom:6px; font-size:14px; color:#9fb0d0;">부정</div>
        <div style="background:#1a2743; border-radius:999px; height:12px; overflow:hidden;">
          <div style="height:12px; width:${data["부정 리뷰 비율 (%)"] || 0}%; background:#fb7185;"></div>
        </div>
        <div style="margin-top:6px; font-size:14px; font-weight:700;">${data["부정 리뷰 비율 (%)"] || 0}%</div>
      </div>
    </div>

    <div style="padding:24px; background:#101a2e; border:1px solid rgba(255,255,255,0.1); border-radius:16px; margin-bottom:16px;">
      <div style="font-size:18px; font-weight:700; margin-bottom:16px;">키워드 Top 10</div>

      <div style="margin-bottom:14px;">
        <div style="font-size:14px; color:#9fb0d0; margin-bottom:8px;">긍정</div>
        <div>${posKeywordHtml}</div>
      </div>

      <div>
        <div style="font-size:14px; color:#9fb0d0; margin-bottom:8px;">부정</div>
        <div>${negKeywordHtml}</div>
      </div>
    </div>

    <div style="padding:24px; background:#101a2e; border:1px solid rgba(255,255,255,0.1); border-radius:16px; margin-bottom:16px;">
      <div style="font-size:18px; font-weight:700; margin-bottom:16px;">긍정 키워드 빈도</div>
      <table style="width:100%; border-collapse:collapse; background:#0f172a; border:1px solid rgba(255,255,255,0.1);">
        <thead>
          <tr>
            <th style="padding:12px; text-align:left; font-size:14px; color:#9fb0d0; border-bottom:1px solid rgba(255,255,255,0.1);">키워드</th>
            <th style="padding:12px; text-align:right; font-size:14px; color:#9fb0d0; border-bottom:1px solid rgba(255,255,255,0.1);">빈도</th>
          </tr>
        </thead>
        <tbody>${posRows}</tbody>
      </table>
    </div>

    <div style="padding:24px; background:#101a2e; border:1px solid rgba(255,255,255,0.1); border-radius:16px; margin-bottom:16px;">
      <div style="font-size:18px; font-weight:700; margin-bottom:16px;">부정 키워드 빈도</div>
      <table style="width:100%; border-collapse:collapse; background:#0f172a; border:1px solid rgba(255,255,255,0.1);">
        <thead>
          <tr>
            <th style="padding:12px; text-align:left; font-size:14px; color:#9fb0d0; border-bottom:1px solid rgba(255,255,255,0.1);">키워드</th>
            <th style="padding:12px; text-align:right; font-size:14px; color:#9fb0d0; border-bottom:1px solid rgba(255,255,255,0.1);">빈도</th>
          </tr>
        </thead>
        <tbody>${negRows}</tbody>
      </table>
    </div>

    <div style="padding:24px; background:#101a2e; border:1px solid rgba(255,255,255,0.1); border-radius:16px; margin-bottom:16px;">
      <div style="font-size:18px; font-weight:700; margin-bottom:16px;">워드클라우드 느낌 보기</div>

      <div style="margin-bottom:12px; font-size:14px; color:#9fb0d0;">긍정 키워드</div>
      <div style="
        background:#0f172a;
        border:1px solid rgba(255,255,255,0.08);
        border-radius:12px;
        padding:18px;
        line-height:1.8;
        margin-bottom:20px;
      ">
        ${posCloud || '<span style="color:#9fb0d0; font-size:14px;">데이터 없음</span>'}
      </div>

      <div style="margin-bottom:12px; font-size:14px; color:#9fb0d0;">부정 키워드</div>
      <div style="
        background:#0f172a;
        border:1px solid rgba(255,255,255,0.08);
        border-radius:12px;
        padding:18px;
        line-height:1.8;
      ">
        ${negCloud || '<span style="color:#9fb0d0; font-size:14px;">데이터 없음</span>'}
      </div>
    </div>

  </div>
</body>
</html>
`;

return [
  {
    json: {
      ...data,
      html
    }
  }
];
⭐️cursur AI로 바이브 코딩하기⭐️
cursur AI 는 쉽게 말해 내가 원하는 것을 말하면, 거기에 맞게 코드를 생성 및 수정하는 프로그램이다. 나는 n8n ai 노드에서 받은 결과값을 html 로 수정하고 싶어 아래와 같이 프롬프트를 작성했다. (json은 ai 결과값을 그대로 복붙한 것이다.)
아래 json을 보기좋게 html로 변경해줘
==

[
  {
    "output": [
      {
        "id": "msg_08ca3baf5ad768e30069b7bdc640108194831978191f60815d",
        "type": "message",
        "status": "completed",
        "content": [
          {
            "type": "output_text",
            "annotations": [],
            "logprobs": [],
            "text": "{\n  \"장소 이름(Business Name)\": \"조양관한정식\",\n  \"긍정 리뷰 비율 (%)\": 98,\n  \"부정 리뷰 비율 (%)\": 2,\n  \"긍정 키워드 Top 10\": [\n    \"음식맛\",\n    \"친절\",\n    \"분위기\",\n    \"룸\",\n    \"정갈\",\n    \"코스요리\",\n    \"가족모임\",\n    \"서비스\",\n    \"접근성\",\n    \"재방문\"\n  ],\n  \"부정 키워드 Top 10\": [\n    \"입구 정리\",\n    \"음식나오는 속도\",\n    \"주차 공간\"\n  ],\n  \"긍정 키워드 빈도 표\": [\n    {\n      \"keyword\": \"음식맛\",\n      \"count\": 85\n    },\n    {\n      \"keyword\": \"친절\",\n      \"count\": 40\n    },\n    {\n      \"keyword\": \"분위기\",\n      \"count\": 30\n    },\n    {\n      \"keyword\": \"룸\",\n      \"count\": 28\n    },\n    {\n      \"keyword\": \"정갈\",\n      \"count\": 25\n    },\n    {\n      \"keyword\": \"코스요리\",\n      \"count\": 22\n    },\n    {\n      \"keyword\": \"가족모임\",\n      \"count\": 20\n    },\n    {\n      \"keyword\": \"서비스\",\n      \"count\": 15\n    },\n    {\n      \"keyword\": \"접근성\",\n      \"count\": 14\n    },\n    {\n      \"keyword\": \"재방문\",\n      \"count\": 12\n    }\n  ],\n  \"부정 키워드 빈도 표\": [\n    {\n      \"keyword\": \"입구 정리\",\n      \"count\": 2\n    },\n    {\n      \"keyword\": \"음식나오는 속도\",\n      \"count\": 2\n    },\n    {\n      \"keyword\": \"주차 공간\",\n      \"count\": 1\n    }\n  ]\n}"
          }
        ],
        "role": "assistant"
      }
    ]
  }
]
그랬더니 아래와 같이 HTML을 만들어줬다. (cursurAI에서 맨 처음 나온 결과물)
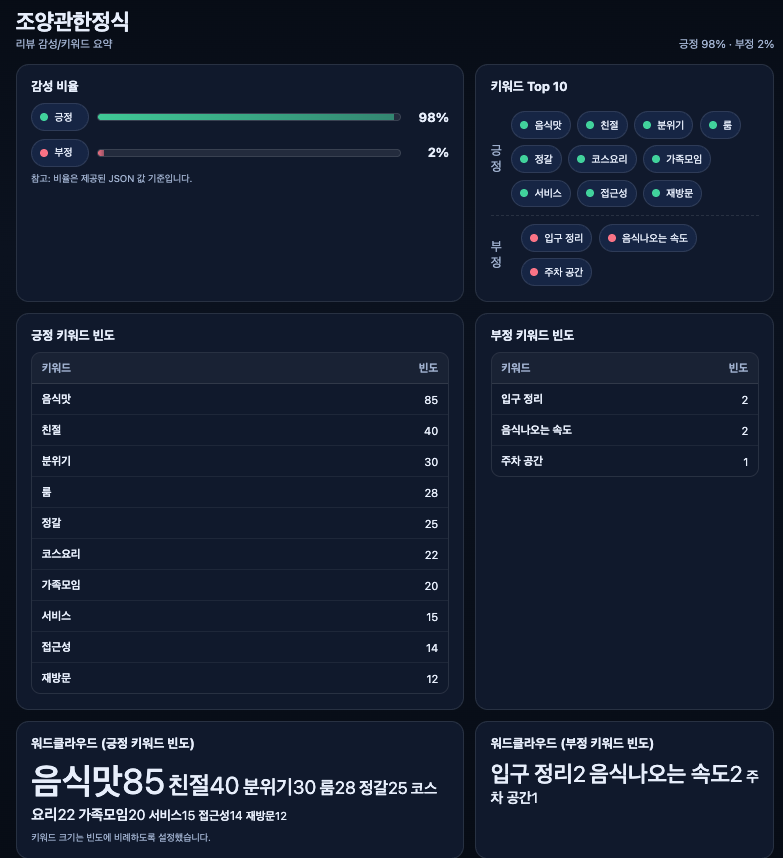
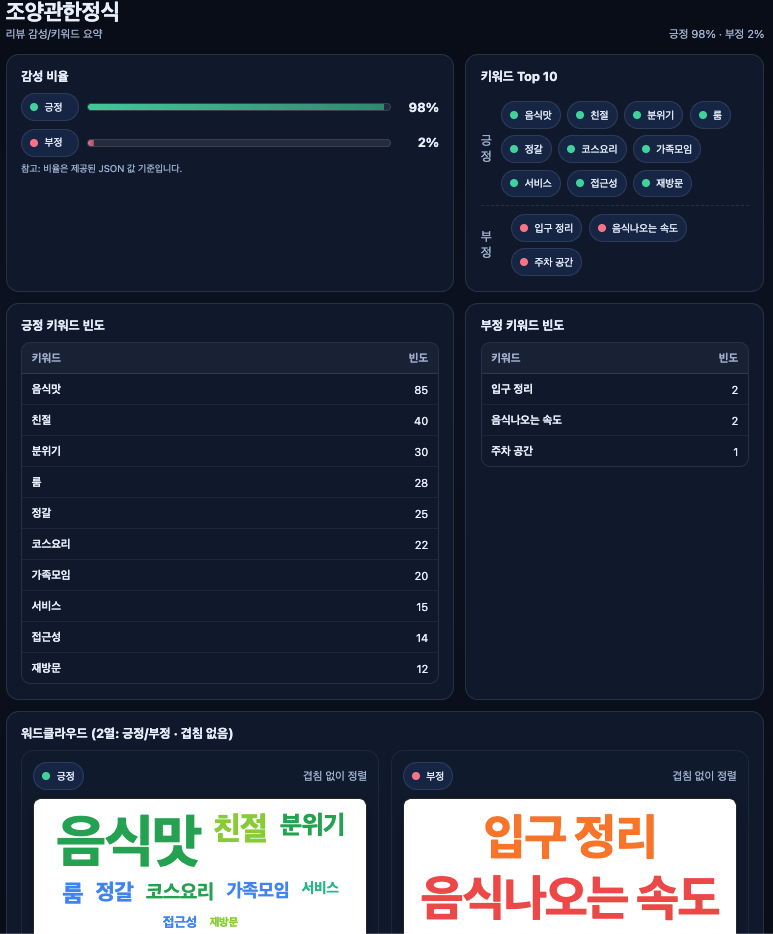
워드클라우드쪽으로 일부 수정하였고 최종적으로 아래 결과물 획득
‼️html 결과물을 확인하려면 cursur ai에서 live server 를 다운로드 받아야 한다.

다만 이걸 그대로 n8n에 붙이면 안된다면 여러 개 업체를 분석할 때마다 ai 분석 결과값이 달라지기 때문. 그래서 결과값이 cursur ai로 만든 html 형태에 맞추도록 바꿔야 한다. 이건 챗gpt 도움을 받았다.
그리고 최종적으로 n8n에 gmail 노드를 추가해주면 끝난다.

👏👏👏 메일로 "신사역 맛집" 키워드 리뷰수 기준 상위 3개 업체 리뷰 분석 내용이 메일로 자동 전송된다.


‼️주의할 것은 HTML 형식으로 메일을 발송할 때 많은 사람에게 보낼 경우 막힐 수 있다는 점이다. 이 경우 n8n에 mailchimp, mailgun 노드들을 사용해 메일을 보내면 된다. 워드클라우드를 이미지로 보내면 되지 않을까? 라고 생각할 수 있는데, 이 경우 따로 AI 결과에서 워드클라우드를 따로 생성하고 이미지화해서 첨부해서 보내는 복잡한 절차를 거쳐야 한다.😭 그래서 가급적이면 100% 완벽한 워드클라우드는 아니지만 위와 같이 비슷한 느낌으로 만드는 것이 낫다.
'AI > [AI_Marketing] trial and error' 카테고리의 다른 글
| [AI마케팅자동화] 유튜브 인기 영상 댓글 분석 및 구글 스프레드시트 자동 업로드 (0) | 2026.03.23 |
|---|---|
| n8n 유튜브 노드 개인 유튜브 계정 연결하기 (0) | 2026.03.23 |
| [AI마케팅자동화] 리뷰 크롤링 후 AI 분석 구글 스프레드시트 업데이트(n8n) (1) | 2026.03.16 |
| [AI마케팅자동화] 데일리 리포트 AI 성과 분석 코멘트 메일 자동 발송(n8n) (0) | 2026.03.09 |
| 코드 참고 (0) | 2026.03.05 |